Okay, here’s my story about installing running boards on my pickup truck. I’ve got this truck, right? It’s a beast, but getting in and out was a bit of a chore, especially for my kids. So, I thought, “Why not make life easier and add some running boards?”

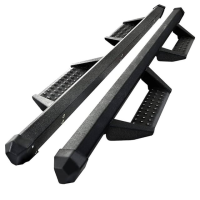
First things first, I had to pick the right ones. I did some digging around and found that there are tons of options. You’ve got different styles, materials, and finishes. I wanted something that looked good but was also tough and wouldn’t rust after one winter. I’m not a fan of that rusty look, you know? After looking at a few brands, I decided to go with something made of aluminum. It’s light, it’s strong, and it doesn’t rust. Perfect!
I started searching online and found the most popular brands were called like Bully, Tyger Auto, and something like that. They seemed pretty legit, with lots of good reviews. I went with Tyger Auto because they had a style that I liked, and the price was right. Aluminum was the way to go – lightweight and no rust? Sign me up.
Once I got the running boards, it was time to get my hands dirty. Now, I’m no mechanic, but I’m pretty handy. The installation seemed straightforward enough. Basically, you just bolt them onto the frame of the truck. Easy peasy, right? Well, almost.
-
Unboxing and Prep
-
Mounting the Brackets
-
Attaching the Running Boards
-
Admiring My Work
I unboxed everything and laid it all out. It’s always good to make sure you have all the parts before you start. The running boards looked great, just as advertised. I grabbed my tools – a wrench, a socket set, and some gloves because I didn’t want to get my hands all greasy.
The first step was to mount the brackets. These are what hold the running boards to the truck. I found the pre-drilled holes on the truck’s frame where the brackets would go. I lined up the first bracket and started bolting it in. It took a bit of wiggling to get it aligned perfectly, but I got it. Then I did the same for the other brackets. It was a bit of a workout, lying under the truck and all, but I got it done.
With the brackets in place, it was time to attach the running boards themselves. I lifted the first one onto the brackets and started bolting it in. This part was a bit tricky because I had to hold the running board up while also trying to get the bolts in. I might have used my head to hold it up a couple of times, not gonna lie. But hey, it worked! I got all the bolts in and tightened them up. I repeated the process for the other side, and voilà, the running boards were on!
I stood back and took a look. They looked awesome! Not only did they make getting in and out of the truck way easier, but they also added a nice touch to the overall look. It’s like my truck got a little upgrade. Now my kids can climb in and out without any trouble, and I don’t have to worry about them slipping.
I’m pretty proud of myself for getting this done. It wasn’t too hard, and it made a big difference. If you’re thinking about adding running boards to your truck, I say go for it! Just make sure you pick the right ones for your needs and be prepared for a little bit of work. But trust me, it’s worth it. My truck looks better, and it’s more practical now. Win-win!
So there you have it, my little adventure with running boards. Hope you found it helpful or at least a bit entertaining. If I can do it, you can too!


