Alright, so I recently decided to add a dump bed insert to my pickup truck, and let me tell you, it was quite the project. But hey, I’m all about that DIY life, and I figured I’d share my experience with you all, step-by-step.

Step 1: Planning and Gathering Stuff
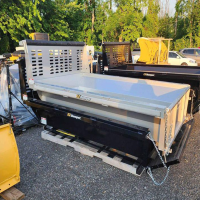
First things first, I needed a plan. I spent a good chunk of time researching different dump bed inserts online, checking out forums, and watching some videos. There’re tons of options, but I settled on a hydraulic system ’cause it seemed like the most heavy-duty for what I needed.
Then came the fun part—shopping! I got myself a hydraulic dump bed insert kit. It came with most of the big stuff like the hydraulic pump, cylinder, and the bed frame. I also grabbed some tools and materials from my garage. I think I have all the needed tools.
Step 2: Prepping the Truck
Before I could start installing the insert, I had to prep my truck bed. This involved removing the existing bed liner, which was a bit of a pain, to be honest. It was all bolted down, so I spent a good hour just unscrewing and pulling it out.
Once the liner was out, I gave the truck bed a good cleaning. I mean, it was filthy! Years of dirt, leaves, and who knows what else. I ended up using a power washer to get it all nice and shiny. I should have done this much more often.
Step 3: Assembling the Insert
Next up, assembling the dump bed insert. The instructions that came with the kit were… well, let’s just say they could have been clearer. But hey, who needs instructions, right? Just kidding! I did follow them, but I also had to rely on some good old-fashioned common sense.
I started by putting together the frame of the insert, bolting all the pieces together. Then I installed the hydraulic pump and cylinder. The connections between the cylinder and the dump bed were kind of tricky, the instructions were vague and confusing. But I figured it out eventually. This part took the longest, and I definitely needed an extra pair of hands a few times. I asked my friend Tom to come and help me with these works.
Step 4: Mounting the Insert
With the insert assembled, it was time to mount it onto my truck. This was probably the most challenging part of the whole project. The insert was heavy as hell, and I had to lift it into the truck bed. Luckily, my neighbor saw me struggling and came over to help. Teamwork makes the dream work, as they say.
Once we got the insert into the truck bed, I bolted it down securely. I double, triple, and quadruple-checked all the bolts to make sure they were tight. I mean, I don’t want this thing flying off when I’m driving down the road! That was terrible.
Step 5: Wiring the Hydraulics
Now for the fun part—wiring! I’m no electrician, but I managed to figure it out. The kit came with a wiring harness, which made things a bit easier. I connected the pump to the battery and installed a switch inside the cab so I could control the dump bed from inside. Connecting the pump to the battery was easy, but installing a switch inside was another story. I even had to remove some interior panels to route the wires. I must be very careful not to mess up the wires, or it will be difficult to fix.
Step 6: Testing it Out
Finally, the moment of truth! I turned on the power and pressed the switch… and guess what? It worked! The dump bed slowly lifted up, and I couldn’t help but feel a sense of pride. I mean, I built that! It’s so cool!
I tested it out a few more times, just to make sure everything was working smoothly. I even dumped a load of gravel just for fun. It worked like a charm! And the lifting speed was also very fast, it exceeded my expectation.
Final Thoughts
So there you have it, my dump bed insert adventure. It was a challenging project, but totally worth it in the end. Now I can easily haul and dump stuff without breaking my back. Plus, it’s pretty cool to have a dump truck, even if it’s just a pickup truck with an insert.
If you’re thinking about adding a dump bed insert to your truck, I say go for it! Just be prepared for some hard work, and maybe have a friend on standby to help you out. And remember, always double-check those bolts! You will be happy with what you have done.


