Okay, so I’ve been wanting to try my hand at some motorcycle artwork for a while now. I just love the lines and the mechanics of bikes, and I thought it would be a cool challenge. So, here’s how I went about it, bumps and all.
Finding My Inspiration
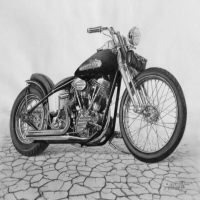
First things first, I needed some inspiration. I started by just browsing pictures of motorcycles online. I looked at all kinds, from vintage bikes to sleek, modern ones. I wasn’t really sure what style I wanted to go for, so I just saved a bunch of images that caught my eye – different angles, close-ups of engines, you name it.
Gathering My Supplies
Next up, I needed to get my art supplies together. I’m mostly a pencil-and-paper kind of guy, so I grabbed my:
- Sketchbook: Just a regular one, nothing fancy.
- Pencils: A range of them, from hard (2H) to soft (6B) for different shading.
- Eraser: A good kneaded eraser, because, well, mistakes happen.
- Sharpener: Gotta keep those pencils pointy!
The Sketching Process
With everything ready, I started sketching. I picked one of the photos I saved – a classic-looking bike with a nice side view – and just started lightly outlining the basic shapes. I wasn’t aiming for perfection, just trying to get the proportions right. It was kinda messy at first, lots of erasing and redrawing.
Once I had the basic outline down, I started adding more details – the wheels, the handlebars, the engine. This is where it got tricky. There are so many little parts to a motorcycle! I spent a lot of time looking back and forth between my sketch and the photo, trying to get everything in the right place.
Then came the shading. This is where the different pencils came in handy. I used the softer pencils for the darker areas, like the tires and the shadows, and the harder pencils for the lighter parts, like the chrome and the highlights. It took a while to build up the shading gradually, but it really started to bring the drawing to life.
Tweaks and Finishing Touches
After I was happy with the shading, I went back and refined some of the lines, making them a bit cleaner and more defined. I also added some small details that I had missed earlier, like the bolts and the cables. It’s amazing how much those little things can add to the overall realism.
The Final Result
Honestly, it took way longer than I expected, My drawing hand almost falls off, but I was pretty stoked with how it turned out! It’s definitely not perfect, but it’s a start. I learned a lot about the shapes and the details of motorcycles, and I’m already thinking about my next one. Maybe I’ll try a different angle or a more dynamic pose next time. Practice makes perfect, right?


