
Okay, so, I finally got around to putting a backup camera in my pickup. It’s one of those things I’ve been meaning to do forever, and let me tell you, it’s a total game changer. I used to dread parallel parking this beast, and don’t even get me started on hitching up the trailer. Now, it’s like, no problem!
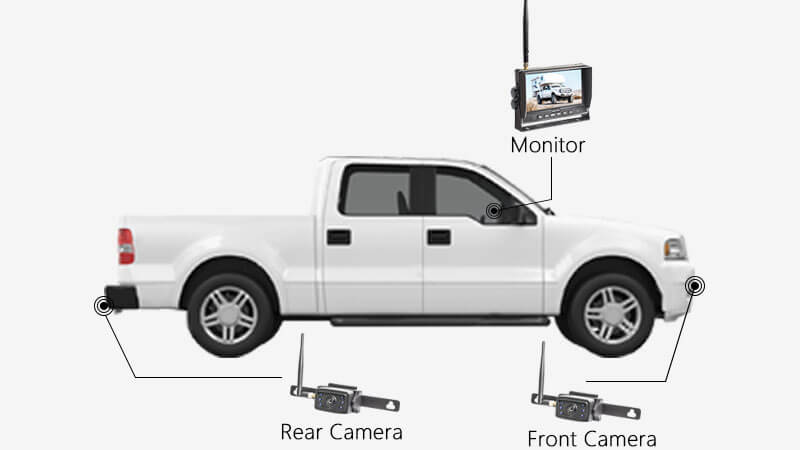
First off, I spent a good chunk of time just researching which camera to get. There are so many options out there, it’s kind of overwhelming. I read a bunch of reviews and watched some videos online. What I learned is that backup cameras are really important for safety. They help you see things that are normally in your blind spots, like kids, pets, or even just a low curb. This is especially important for bigger vehicles like our trucks.
After I decided on the camera, I started gathering my tools. I needed a drill, some screwdrivers, wire strippers, and a few other things. I made a list, and made a trip to the hardware store. It was pretty standard stuff, nothing too crazy. The kit I picked came with most of the small bits and pieces, which was handy.
- Drill
- Screwdrivers
- Wire strippers
- Pliers
Then came the fun part—actually installing the thing. I started by finding a good spot for the camera. The instructions suggested mounting it near the license plate, so that’s what I did. I used the template that came with the camera to mark where I needed to drill. I was a little nervous about drilling into my truck, but I took it slow and it was fine.
Mounting the camera was the most time-consuming part. I had to remove some trim pieces on the inside of the tailgate to get access to the wiring. I’m not gonna lie, it was a bit of a pain, but I managed. Once I had access, I ran the camera’s wires through the tailgate and into the cab. I followed the existing wiring harness as much as possible to keep things neat.
Next, I started to connect the camera’s power wires to the reverse lights. This way, the camera would automatically turn on when I put the truck in reverse. I used the wire tap connectors that came with the kit. They were pretty easy to use, just crimp them onto the wires and you’re good to go.
The camera I chose came with a small monitor that I mounted on my dashboard. I ran the video cable from the camera to the monitor and plugged it in. I also had to connect the monitor to a power source. I used a fuse tap to connect it to the fuse box, which was easier than I expected.
Testing
After everything was connected, I turned on the truck and put it in reverse. And there it was! A perfect view of what was behind me. I was so stoked! I tested it out a few times, backing up into my driveway and parallel parking on the street. It worked like a charm.
I’ve been using the backup camera for a few weeks now, and I can honestly say it’s one of the best mods I’ve done to my truck. It makes driving so much easier and safer. If you’re thinking about getting a backup camera, I highly recommend it. Just do your research, take your time with the installation, and you’ll be good to go!


